If you’re like me, you’ve found that accessible backup solutions aren’t necessarily the best options. You want to protect your files, expand storage, and provide a platform that can grow with your needs. Today I’m talking about building a low-cost NAS using GlusterFS.
I’m primarily focusing on the solution I’ve recently selected for my own home setup, but I’ll also mention some alternatives and past solutions I’ve used. My intended audience is somewhere along the “prosumer” track. That is, people who are familiar and comfortable enough messing around with some manual software and hardware configuration.
DISCLAIMER: This is a pretty long post. I apologize in advance. Some areas could use more detail, other areas I felt couldn’t be reduced more without losing valuable info. Feel free to ask questions.
What is a NAS?
While my intended audience is the prosumer market, I’m going out on a limb here that beginners are also coming across this post. With that in mind, I’ll try to keep things as low-key as possible.
So… what is a NAS? NAS stands for network-attached storage. That’s just a fancy way of saying storage that is accessible to and from a network. As opposed to a hard drive or thumb drive, a NAS is accessible by multiple people and devices at a time.
Granted, you can share storage from a computer to others on your network and that can act as a sort of NAS, but for the purposes of this blog entry, we’re discussing dedicated network-based storage.
If you want to read up a little more about what a NAS is, I invite you to read ioSafe’s post about it.
Why would I want a NAS?
Now that we understand what a NAS is, we now ask the question “why would I want a NAS”? Among the reasons is that a computer itself can only be expanded to a certain degree — limited by the internal ports and capacity it has to hold more hardware. You may have a full desktop system that has eight expansion ports, four m.2/NVME slots, etc. That’s great, you can fit a ton in that thing. But what about those who have a small laptop or mini-form factor desktop? Those are extremely limited in expansion capacity.
Yes, you may choose to purchase a USB-attached storage bay. Those are great and serve a purpose. That said, those still don’t necessarily hit the points of why one might want a NAS.
I alluded to one reason when talking about what a NAS is — dedicated shared storage accessible via the whole network. Most turn-key NAS solutions offer built-in security, installable app support, and more. They are, in essence, miniature servers on top of being a storage provider.
For my household, the primary use of our NAS is as a fileserver. We store all our media (music, pictures, movies, tv shows), as well as generic file storage, and backups. I used to run applications from the NAS, but as of this current build using GlusterFS, I no longer do.
As you look into them, however, you’ll see that you can start shelling out quite a chunk of money pretty quickly. Even for home user devices, the price adds up fast. The fact you’re here at all means that, like me, you want to find a low-cost NAS solution.
What is GlusterFS?
GlusterFS is a distributed file system that runs on Linux and Unix. It allows you to set up file shares as volumes. Each volume is configurable in how (or if) it is distributed across multiple “bricks.” Each “brick” in a cluster represents a physical device (generally a hard drive on a server).
For additional information, I invite you to read Wikipedia and GlusterFS documentation.
Gluster volumes can be set up in several different modes or types. For this tutorial, we’ll be using a distributed dispersed volume type. This type of volume “distributes files across replicated bricks in the volume” but also “provides space-efficient protection against disk or server failures.” I invite you to read more on the various volume types on GlusterFS documentation.
The very way GlusterFS is architected allows one to approach it low and slow, if desired, and come out of the gate with a low-cost NAS. I’ve seen tutorials about setting one up using Raspberry Pi devices. Others talk about using different variations of ODROID devices. Yet others talk about spinning them up using cheap desktop machines or NUCs.
The point is, however, that any one of those options is approachable if you’re willing to get your hands dirty.
Low-cost NAS hardware list (getting started)
Ok. Enough boilerplate. We’re here because we want to learn how to set up a low-cost NAS using GlusterFS, right?
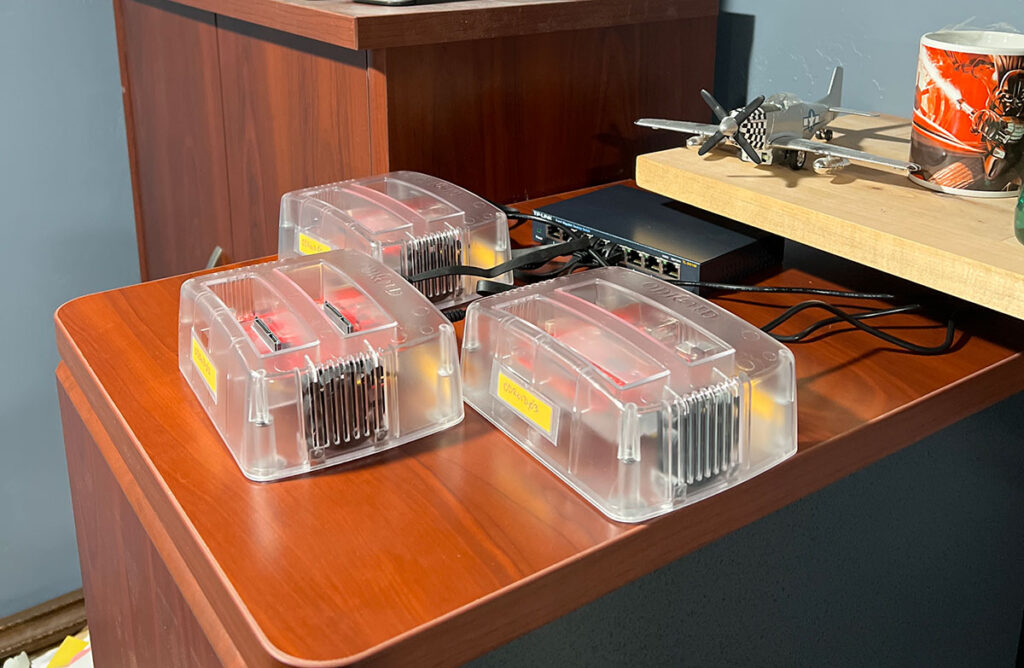
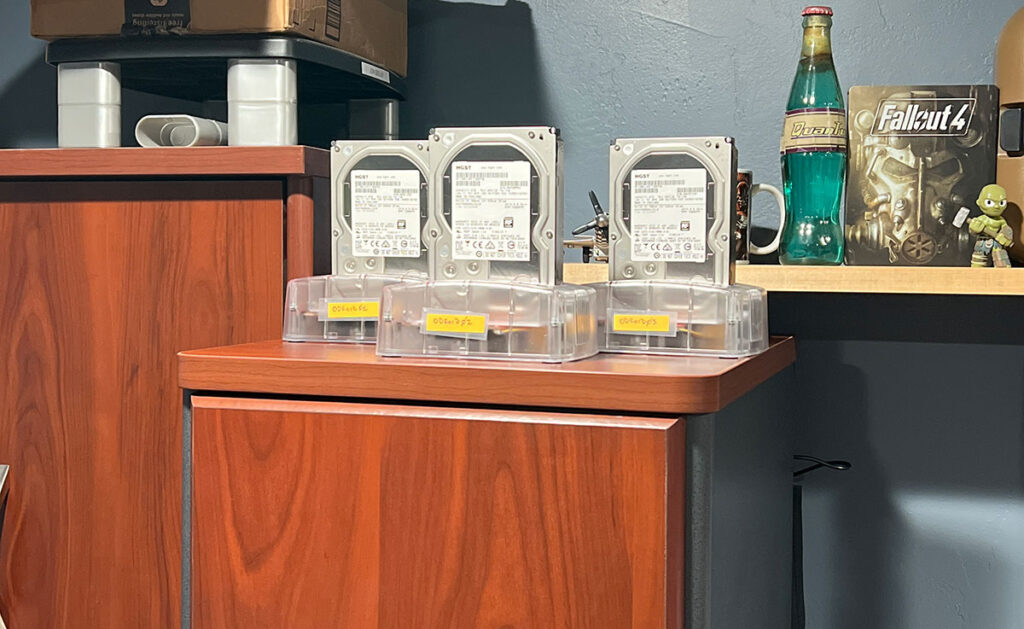
While there are many ways one can approach this, I’m specifically addressing the route I took. I have mine configured in a 2+1 (two data drives plus one parity drive) setup. For example, if I have three 6TB drives, I’ll end up with roughly 12TB usable storage in GlusterFS. For my initial build-out, I purchased three ODROID-HC4 devices + power supplies, three 6TB drives, and four (due to packaging) microSD cards. My total purchase came out to $588 after tax. This build gave me an initial 12TB storage on the cluster.
- ODROID-HC4 – the ODROID-HC4 is a mini PC with two drop-in SATA drive ports, a gigabit ethernet port, 4GB RAM, a micro SD slot, and HDMI support. I purchase mine from ameriDroid. At time of writing, the base model (which is all you need) runs $88.95 per unit. You *also* need to purchase a 15v/4a power supply, which is another $12.95 each. (it is listed in the sidebar when you’re adding this to the cart from ameriDroid).
- For the OS installation, you will want a high-speed micro SD card. I personally went with the SanDisk 64GB X2 MicroSDCX Ultra Uhs-1 cards. At time of writing, a 2-pack runs $14.99 on Amazon.
- Hard disks – the key point here is that whatever you pick, you stick with. Every single drive on a cluster *must* be the same (model, size, etc). This is due to how GlusterFS handles error correction and parity checks. I personally use 6TB HGST 7200 RPM Ultrastar drives. I purchase them used/refurbished off eBay. They are cheap enough, widely available, and large enough that they do the job. I’ve been able to find these in the $50-60 range most of the time. I highly recommend also purchasing a spare drive of whatever you end up with so if one goes bad, you have a backup on hand for easy swapping. I’ve had to do this once already so far.
While not required, you may also want to purchase a small network switch and cables to appropriately wire up your new hardware. I have mine set up on a shelf in the side of my office and have daisy chained a separate switch from my main office switch, and then have each ODROID connected to the separate switch. You might also consider getting a battery backup to protect them during outages. I don’t have one yet.
Assumptions
The rest of this blog post will assume you have the same hardware setup I do. That is: three ODROID HC4 devices and one drive each. The next assumption is that you’re going to use a “distributed dispersed” volume which is built using three drives, one of which is a redundancy drive.
Setting up your low-cost NAS (servers)
The first step in setting up the servers is choosing an OS. I opted to go with Ubuntu 20.04.4 via the “official” minimal LTS release for Odroid HC4. This can be found on their wiki. I want to note here that although there is a 20220705 version available, that one didn’t work for me (failed to boot).
I followed the directions on the Odroid wiki for preparing the microSD card. For easy reference, I’m enumerating them below:
- Download the image you wish to install.
- Please note the default login for any of these images is User:
root/ Password:odroid.
- Please note the default login for any of these images is User:
- Download a microSD flashing tool such as Balena Etcher or Rufus. (other tools also work, these are just the two I’m aware of)
- Insert the memory card you want to flash with the image, select the image, select the appropriate drive, and “flash” the image to your media.
Preparing the drives
On each Odroid, follow the following steps:
- Connect the Odroid to a monitor and keyboard, insert the microSD card. Do not insert the hard drive(s) yet.
- Boot up using the microSD card.
- Once booted, name the host to whatever you want. By default, each Odroid is named “odroid.” I chose “odroidXX” as my naming convention (odroid01, odroid02, odroid03). You can rename the device using the following command:
sudo nano /etc/hostname - Install XFS using the following command:
sudo apt-get install xfsprogs. Note, you don’t have to use XFS as the file system, but it is what I chose. - Power-off the odroid.
- Insert hard-drive(s) to slot(s). I chose the front slot for the first set of drives. This just makes it easier for my brain to group them together in a logical way. You may also choose to do one drive per device at a time so it makes it easier to differentiate them in the subsequent steps. (I did)
- Power the device back on. Once booted, use
lsblkto find out which slot the drive(s) are in. If it is the first drive, it is most likely indev/sda. Use can use the flag-fto show the UUID of the device as well, should you wish. - Format the drive now using
mfks.xfs -i size=512 /dev/sda(wheresdais the primary drive; it could besdbif it is the secondary drive). If you didn’t choose to use XFS as the file system in step #4, you would format the drive using whatever you did choose (such as EXT4). - Create a folder that will represent the brick and volume you’re setting up:
sudo mkdir -p /data/brickXX/gv0(where XX is the physical brick # such as 01, 02, 03, etc.). Thegv0subfolder is whatever you want to name your volume in GlusterFS. I arbitrarily picked gv0 to stand for “gluster volume 0”, but you can call it whatever you want. It will have that same name on *every* brick.- Note: the gluster volume is where the cluster will house data and it is recommended to be a subfolder from the main mount folder. (see step #9). It *does not* have to be called gv0.
- Now that you have a folder ready, it is time to mount it. We want it to automount each time Linux reboots, so we’re going to add it to
/etc/fstabusing the following command:echo '/dev/sda /data/brickXX xfs defaults 1 2' >> /etc/fstab(wheresdais the drive location (sda,sdb, etc) and XX is the brick such as 01, 02, 03, etc.). You could also choose to mount via UUID instead of/dev/sda. To do this, you would echoUUID=00000000-0000-0000-0000-000000000000in place of/dev/sdawhere the UUID matches your drive id.- For convention, you would name the first brick (in odroid01) as brick01, the first brick (in odroid02) as brick02, the first brick (in odroid03) as brick03.
- Finally, it’s time to actually mount the drive. You do this by executing
mount -a. This command automatically mounts anything infstabthat isn’t already mounted. - Lastly, we want to set up hosts entries for each device so they have knowledge of one another without a DNS resolution hop. Run the following command
sudo nano /etc/hoststo edit the hosts file. Add entries similar as below (but matching the IP addresses for your devices):
192.168.1.10	odroid01
192.168.1.11	odroid02
192.168.1.12	odroid03
Additionally, it would be a smart idea to set static IP addresses for each device in your router. Since routers vary widely, I’ll leave that step to you.
Setting up GlusterFS
Now that we have each of our three Odroid devices set up with a drive (or two), it is time to get the cluster set up.
On each Odroid, we will need to add the PPA for GlusterFS packages and then start the service. Use the following steps to do so:
sudo add-apt-repository ppa:gluster/glusterfs-7– this adds the PPA for GlusterFS packages.sudo apt update– this refreshes each server’s local package index.sudo apt install glusterfs-server– this installs the GlusterFS server package. When prompted, pressYandENTERto confirm the installation. This configures GlusterFS as asystemdservice, but will not automatically run it on boot.sudo systemctl start glusterd.service– this starts the servicesudo systemctl enable glusterd.service– this enables the service to start on bootsudo systemctl status glusterd.service– this checks status; just want to make sure it is active and running.
From the primary Odroid (in my case, I chose odroid01), you will need to execute the following steps (see also Install – Gluster Docs for more information):
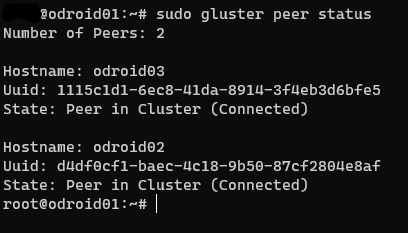
- You will first need to create a trusted pool. This is done by executing
sudo gluster peer probe odroidXXwhere XX are the other two devices. I tried doing it all as one operation like the docs mentioned but didn’t seem to work. I had to do them one by one. - (from each server) check the status of the peers.
sudo gluster peer status - Create a three-brick volume using
distributed dispersedtype.
sudo gluster volume create gv0 disperse 3 redundancy 1 odroid01:/data/brick01/gv0 odroid02:/data/brick02/gv0 odroid03:/data/brick03/gv0Please note that you might have to add force to the end of the previous command. My first attempt, I did have to, but I also had the wrong volume type originally. I ended up removing the previous volume and starting over altogether.
We now have a volume, but it isn’t started yet. You can check this by executing the command gluster volume status. Assuming it isn’t started, you will want to run sudo gluster volume start gv0 where gv0 is whatever you actually named your volume.
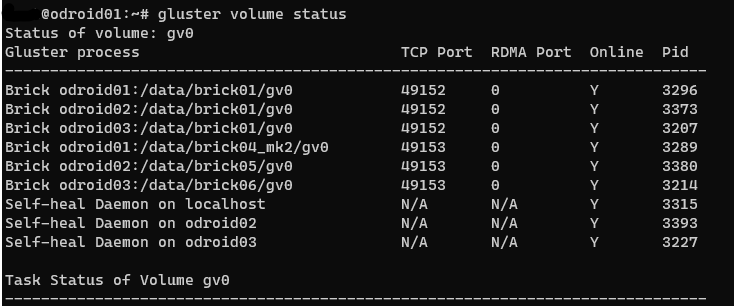
You’ll notice in my screenshot above I don’t follow the naming convention I’ve suggested. That’s because I didn’t quite realize it until it was too late for the first batch of drives. The second batch of drives does follow the new convention. You’ll also notice that one of the drives in the second batch is named brick04_mk2 — this is because the original brick04 died on me the day after I installed it. I’ll address this in slightly more detail later.
Congratulations, you now have a low-cost NAS.
Testing your cluster
Of course, having somewhere to store files isn’t really all that helpful if you can’t access it, right? There are a few different ways to do so, but first, let’s start by using the GlusterFS client.
The easiest way to test this is to mount the volume right back to the same device that hosts it (aka odroid01, odroid02, odroid03). In this case, we’re going to mount the entire volume, not individual folders.
To do so, you will need to first install the GlusterFS client on the device(s) you wish to mount to. This can be done by executing `sudo apt install glusterfs-client`.
Now installed, we need to create a folder that will be our mount point. Linux convention says to do so in the /mnt folder (such as /mnt/gluster, for example). Realistically, you can put it anywhere you want though. For sake of this example, we’re doing in the mnt folder. sudo mkdir /mnt/gluster.
Finally, let’s mount the folder and test it out! We do this by issuing the mount command: sudo mount -t glusterfs odroid01:gv0 /mnt/gluster. From left to right, what this does is mount using the glusterfs type/client, from the odroid01 server and the gv0 volume, and mounts it to the /mnt/gluster folder. Now that it is mounted, issue the df command (disk free) to get a listing of space available.
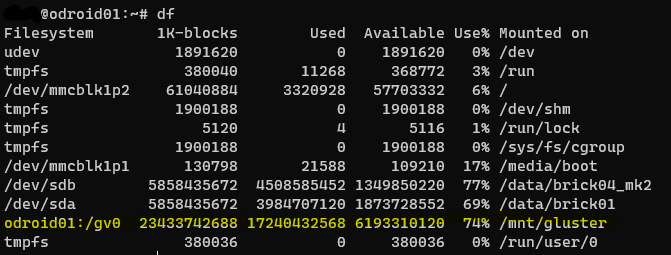
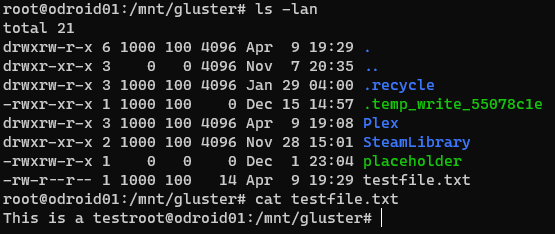
df command.If you want to test it further and you’re unfamiliar with Linux, you can issue the command cd /mnt/gluster to move into that folder. Next, you can test creating a file by issuing the command echo hi > hi.txt followed by cat hi.txt to display the contents of the file. Delete the file now by issuing the command rm hi.txt. Verify it is gone via the ls command.
Accessing your low-cost NAS cluster
Now that we have a working and tested cluster, it’s time to access it from real clients. If they are Linux machines, I recommend you access them using the GlusterFS client. We already went over how to install and mount that.
If, like me, you also need to access your cluster from Windows machines or machines that cannot install the native GlusterFS client, you have some options. I have tested two of them: Samba, and NFS. Gluster Docs provides some instructions on how to set Samba up using CTBD. I originally went a different path exposing a Samba server via a spare Raspberry Pi, so I didn’t go the CTBD route. At some point, I really should.
That aside, let’s just assume the shorter path for now.
Setting up Samba to expose your low-cost NAS
The Samba protocol has been around since 1992 (originally the SMB networking protocol). As such, it is widely supported across multiple platforms. Furthermore, it is still undergoing continuing development which means it is keeping up with changing technologies.
As previously mentioned, I first exposed my GlusterFS volume via Samba server on a Raspberry Pi. After I expanded the volume the first time, however, I decided to just expose Samba directly from the ODROIDs themselves. That is the reason I didn’t go with CTBD. That also impacted the notes I took during the process, unfortunately, so I’ll go on record right now and say there is a very decent chance I’m missing something in this section. If so, and if you run into it and figure it out, please let me know so I can adjust this post.
Another thing to consider is that I am not an expert on Linux or Samba. Not even close. I’m simply surfacing the things I learned in my little foray into it. If you know of a better way, please share.
Ok, now that the expectation is set and disclosures are out of the way, let’s dig in.
Since you’re not going with CTBD, you need to choose which ODROID you’re going to serve up Samba from. I arbitrarily picked odroid01 personally. On whichever machine you choose, install Samba using apt-get install samba. You might also need to install cifs-utils and smbclient. (the “Samba for Dummies” PDF does call for installing all three). Note that this will automatically start the smbd service after installation. You can verify this by running systemctl status smbd.
We now have a working Samba service, but we still need to get your GlusterFS volume exposed through it. GlusterFS can automatically export your cluster into the Samba configuration, so let’s go ahead and do that. Issue the following command gluster volume set gv0 user.smb enable (or disable, to turn it off). Doing so will immediately modify the smb.conf and add an entry for your volume.
You can verify your smb.conf file by running testparm -sv (see also Samba docs on testparm). Near the very bottom of the output, you should see something similar to below:
[gluster-gv0]
        comment = For samba share of volume gv0
        path = /
        read only = No
        vfs objects = glusterfs
        glusterfs:loglevel = 7
        glusterfs:logfile = /var/log/samba/glusterfs-gv0.%M.log
        glusterfs:volume = gv0
Technically, you have a Samba share that you could access from another machine. But guess what? It probably won’t work. Why? Security. Frankly, you don’t want to access it using the root user anyway, right? Additionally, I found that the auto-added entry doesn’t work for me and I’m guessing it has something to do with the fact I’m not using CTBD.
Implementing Security on Samba
I’m going out on a limb here and assuming you’re not running Active Directory. Yeah, neither am I. With that in mind, you’ll need to add a user to your ODROID Linux install first, and then add that same user to Samba. Do this by running sudo adduser <username>. In order to log in as this user, however, we still need to set their password. Do this by executing sudo passwd <username>.
Next, I would recommend also adding a different group. Do this by running sudo groupadd <groupname>. Add your new user to this new group by executing sudo usermod -a -G <groupname> <username>. And finally, I’d recommend setting that user’s primary group to the new one we just added sudo usermod -g <groupname><username>. You don’t have to set the default group as we can override which group is used in the share, but it is a step I took myself.
Now that you have the user created and attached to a group, let’s create the same user in Samba. This is done by executing sudo smbpasswd -a <username>.
Potential Caveats
One thing I ran into with my specific setup is that I already had an Asustor NAS running on the network. That existing NAS already had credentials I was using to connect it’s exposed Samba share. If you’re familiar with Linux security, you might see where I’m going with this. I needed the uid and gid of that user to match the new user I was creating for my GlusterFS Samba share. Did I mention I’m not a Linux expert? Yeah.
Linuxize.com was a great resource for me in figuring out how to create users on disparate machines but set the same uid and gid across them. Turns out you can create users with specific uids and groups with specific gids. Makes things easier for consistency. I specifically followed their guides on How to Create Users in Linux, How to Create Groups in Linux, and How to Add User to Group in Linux.
Getting a Samba share exposed, for real
Ok cool, we have a user, they’re in a group. Finally, time to set up a Samba share that we can access somewhere else. Let’s edit our /etc/samba/smb.conf file and add the following entry to the very bottom.
# name this whatever you want it to show up as (see screenshot after this section)
[glustertest]
comment = testing
path = /mnt/gluster
read only = no
guest ok = yes
writeable = yes
force user = <username>
force group = <groupname>
# other optional settings below
# create mask = 0775
# force create mode = 0775
# directory mask = 0775
# force directory mode = 0775
# valid users = @users
# inherit permissions = yes

hide dot files = yes

# Configure fruit to deal with Apple's garbage filesystem
# These options are configurable. Check the docs for the possible values
# vfs objects = recycle fruit streams_xattr
vfs objects = fruit streams_xattr
fruit:aapl = yes
fruit:encoding = native
fruit:locking = none
fruit:metadata = stream
fruit:resource = file
recycle:repository = .recycle
recycle:keeptree = yes
recycle:versions = no
recycle:touch = yes
recycle:excludedir = tmp temp public Plex/*
recycle:exclude = *.tmp ~$* *.log
The path above should map to the folder you mounted your GlusterFS volume locally to odroid01 (or whichever one you’re one). Both force user and force group should map to the new user and group you created. I have guest ok = yes set above as well. Honestly not certain why I had to set it to “yes”, but even if I successfully authenticated the user (and had this set to “no”), it wouldn’t let me access the share. Only setting it to “yes” allows it to work.
Once we’re relatively comfortable with our changes, we can save the file and then execute smbcontrol all reload-config to reload the Samba configuration. Now via Windows Explorer, we can attempt to find our share by navigating to //odroid01. (assuming you have a hosts file entry for it on your Windows machine, otherwise access via the IP address).
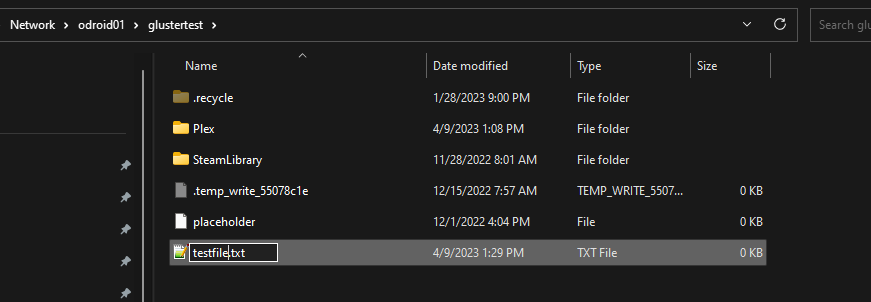
Assuming we did everything correctly, you can open up glustertest using the username and password you created on Linux for the new user. Create a new text file in there and edit it. Back over on the odroid, navigate to the mount folder, and see if that file is there. Cat it to see if it has the contents.

Performance Tuning (according to Gluster Docs)
There are a few suggestions I’ve cobbled together from different sources when it comes to tuning the performance of your Samba Share. According to the Gluster Docs (already referenced above), we’ll want to issue this command on the server hosting Samba: gluster volume set gv0 storage.batch-fsync-delay-usec 0.
When I run gluster volume info on my cluster, I see a few other settings I adjusted. We set those values similar to how we set the storage.batch-fsync-delay-usec value. Those values are as follow:
storage.batch-fsync-delay-usec: 0
features.cache-invalidation: on
transport.address-family: inet
storage.fips-mode-rchecksum: on
What about NFS?
Let me start by saying that I ultimately decided not to use NFS. I was having some trouble with Samba initially, so was exploring NFS as an alternative to expose my low-cost NAS to the network.
I followed instructions from Server World’s article GlusterFS: GlusterFS + NFS-Ganesha. I’m not going to go into more detail about NFS except to share a couple “gotchas” I ran into when trying to mount the share in Windows.
First, I had to enable the NFS client in Windows. This is done via the Windows Features dialog (see screenshot below):

I found that within the Ganesha config (found in /etc/ganesha/ganesha.conf), I had to add DISABLE_ACL = TRUE; for Windows to see it correctly using the “anon” user.
After enabling the NFS client, you can mount the Gluster share in multiple different ways.
# regular mount
mount odroid01:/vfs_distributed T:

# mount as anonymous; requires setting AnonymousUid / AnonymousGid registry
mount -o anon odroid01:/vfs_distributed T:

# mount as user; requires passwd and group files in windows/system32/drivers/etc
mount -o nolock odroid01:/vfs_distributed T:

# as above, but sets a hard mount type
mount -o nolock -o mtype=hard odroid01:/vfs_distributed V:
You can enable auto-mount within Windows by creating a batch file that runs on Startup. That batch file would include one of the above commands.
You can locate your startup folder by using Windows + R to open the run dialog, then typing shell:startup and hitting ok. In that folder, I created a batch file called nfsmount.bat and used the mount -o nolock odroid01:/vfs_distributed T: option. For that to work, I created a group and passwd file in C:\Windows\System32\drivers\etc that contained my user and group mappings to match the Ubuntu servers.
Maintaining your low-cost NAS
This post has grown a bit long. Watch for a follow-up post where I give more detail about maintaining your low-cost NAS which includes how to expand the volume later as well as replacing failed bricks.
Alternative Solutions to my low-cost NAS
By no means comprehensive; what follows is a small selection of alternative solutions to using GlusterFS as a low-cost NAS solution. Pricing, support, and expandability all vary.
- Ceph – CephFS is a distributed object store similar in concept to GlusterFS. I honestly don’t know much about it, except that it exists. See more here.
- Unraid – Unraid is an OS that allows you to have control over more than just data. It is more of a turn-key solution that not only can run as a NAS, but also can host applications. I may be sorely mistaken, but I don’t believe Unraid is horizontally scalable (as in, it is only a single box and thus is limited by how much you can expand hardware on that single box). Read more about Unraid here.
- Turn-key hardware solutions:
- Synology
- Asustor
- Buffalo
- QNAP
- WD
- and more…
My past (more expensive) solution
For my initial foray into network-attached storage, I opted to go with an Asustor AS6404T 4-bay system. I purchased four 10TB WD Red Pro drives to go with it and set them up in RAID 10 (striped+mirrored) mode. This gave me 20TB usable space and was *fast*. Initially seemed more than enough to cover anything and everything I could want. Didn’t take me too long to realize I was wrong.
For one thing, the configuration cost me nearly $2k right off the bat. Then, it was fairly static. Yes, Asustor has USB-enabled expansion pods you can get and hook up, but given the cost for drives, it seemed unapproachable. In fact, it was anything but a low-cost NAS solution.
Granted, the Asustor was great for what I needed most of the time. I was able to install many apps (such as Plex) with the “push of a button.” The Asustor also supported DockerCE and PortainerCE, which only served to expand its usefulness.
But… the hardware struggled under certain use cases, for example, trying to transcode 2-3 simultaneous streams on Plex. That and, as mentioned, I was locked to 20TB without a rebuild or an expensive expansion.
All said, however, the Asustor was easy to use and did serve my needs for many years.
Conclusion
Today I’ve presented you with a low-cost NAS solution using GlusterFS and Odroid HC-4. Turnkey solutions are easy and have a low barrier to entry, but they aren’t necessarily expandible nor grow with your needs.
Additional Resources
- What is a NAS device and how does it work? – ioSafe
- GlusterFS specific resources:
- Getting started with GlusterFS – Gluster Docs
- How to Create a Redundant Storage Pool Using GlusterFS on Ubuntu 20.04 – DigitalOcean
- NFS-Ganesha:
- GlusterFS + NFS-Ganesha – Server World
- GlusterFS: Configuration and Setup w/NFS-Ganesha for an HA NFS Cluster – MicroDevSys.com
- Persistent NFS Client on Windows 10 – Dopamine
- Accessing Gluster volume via SMB Protocol – Gluster Docs
- Windows (CIFS) fileshares using GlusterFS and CTDB for Highly available data – Gluster.org
- Samba Resources
- GlusterFS – Samba Wiki
- Samba for Dummies (PDF)
- How to Setup a Raspberry Pi Samba Server – PiMyLife
- Raspberry Pi NAS With Gluster – Nick Howell
- Setting up a Standalone Storage Server with GlusterFS And Samba – HowtoForge
- Enabling Recycle Bin for Samba File Server – PowerADM
- Beginners Guide to Samba – The Geek Diary
- Samba and Linux – A Guide to Setup and Use Samba – Linux for Devices
- Install and Configure Samba – Ubuntu.com
- Samba: Unable to locate guest account [smbguest]! – Smithfarm – the Brain
- List Samba users? – SuperUser Stack Exchange
- server – How can I set up Samba shares to only be accessed by certain users? – Ask Ubuntu (stackexchange)
- Linux Resources:
- How to Create Users in Linux (useradd Command) – Linuxize
- How to Add User to Group in Linux – Linuxize
- How to Create Groups in Linux (groupadd Command) – Linuxize
- How to List Groups in Linux – Linuxize
- Change Linux group information (groupmod) – kazmax
- Chmod Calculator
- Chmod permission description – Ask Ubuntu
- Unraid – an alternative DIY NAS solution
- Intro to Ceph – Ceph Docs; another alternative NAS file system
- Shopping List
- ameriDroid listing for ODROID-HC4 – ameriDroid
- SanDisk 64GB X2 MicroSDCX Ultra Uhs-1 Memory Card – Amazon
- HGST Ultrastar 7K6000 HUS726060ALE610 6TB – eBay (yes, this listing is out-of-stock, just serves as a starting point)
- Your Network Drives Keep Disconnecting When You Reboot (in Windows) – landfx
Credits
Cover photo by Vincent Botta on Unsplash