
Over the years we’ve seen .NET mature and change since v1. We’ve seen server technologies mature in many ways. Things we did yesterday don’t necessarily work the same way today. One of those things that recently struck me was how request timeouts work in IIS. If like me, you just assumed they worked the same in .NET Core then I invite you to join me on this journey. Let’s explore how to make ASP.NET Core request timeouts work properly with IIS in-process hosting mode.
Code for today’s post is found on GitHub.
Exploring the past
I frequently like to start our journey at the beginning. It helps to understand the past before we can comprehend the present.
In our early ASP.NET days we could set the request timeout in one of two ways:
Server.ScriptTimeout = x;– this allowed us to use code to set the timeout in seconds. See also MSDN.httpRuntimeelement in our web.config file. See also MSDN. This property only worked if the application haddebug=falsein the compilation element.
According to this Stackoverflow answer, the defaults were 90 seconds for ASP.NET 1.x and 110 seconds for .NET 2.0+. Generally speaking, these defaults were sufficient. It was a rare case where a longer time was needed.
The point, however, is that it had defaults and would cut off long-running requests.
Our recent past
As web technologies progressed it became apparent that ASP.NET full framework was a bit of a hog. In fact, according to TechEmpower, ASP.NET had a composite score ranking only one above the slowest competitor. Speed aside, it was (and still is) a great framework to work in. Microsoft could do better. And they did.
ASP.NET Core brought a full rewrite from the ground up. Instead of the heavy approach in previous versions, .NET Core allowed an extremely modular and streamlined approach. That same graph above currently places ASP.NET Core with a composite score ranking 6th overall.
These changes weren’t without cost, however.
ASP.NET Core 2.0-2.1
Rather than start with the first entry in this new framework, I decided to start with 2.0. In all honesty, this is simply because I didn’t start working with .NET Core 1.1 until shortly before 2.0 shipped and I don’t really remember the differences well enough to track them.
With that in mind, hosting an ASP.NET Core 2.0 application in IIS was done using a reverse proxy to Kestrel. This meant that IIS wasn’t really using many of its advanced features such as request queues, limits, etc. Instead, it was just proxying requests to the underlying Kestrel server. Instead of the way you handled it in ASP.NET full framework, you now had to set it at the ASP.NET Core module level.
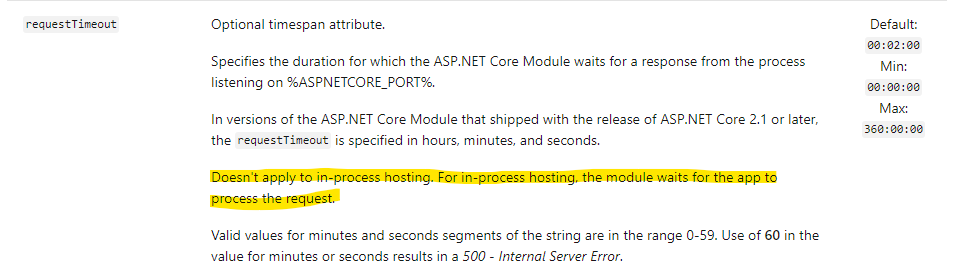
This was done by setting the requestTimeout attribute for the ASP.NET Core Module in your web.config. If you didn’t set it, it had a default timeout of 2 minutes.
And then it changed…
Look, I’m pretty embarrassed to say I didn’t even realize it until this week. But… it’s true.
When ASP.NET Core 2.2 was released, we saw a world of change. Lo! We were given the opportunity to once again host our .NET Core applications directly inside IIS as a 1st class citizen. This had major performance implications. The irony is that I’ve already talked about this in another blog post and referenced Scott Hanselman’s post about Useful ASP.NET Core 2.2 Features.
Somewhere in there though I just assumed (yeah yeah, I know what assuming does) that by going in-process with IIS meant that IIS would take over control on a lot of things I was used to it doing in the old days. Generally speaking, that assumption was correct. What I failed to notice was that the requestTimeout attribute I referenced above stopped being applicable.
Ok, so how did you notice?
The short answer: APM software, that’s how. The longer answer is that somebody from release engineering brought it to our attention. They noticed some odd calls that were off in La La Land running for an absurd length of time.
Once brought to my attention I curbed my assumptions and started researching. I dug around and came to the sad conclusion that the ASP.NET Core request timeout isn’t what I thought it was. It didn’t exist at all in our setup and was by design. A comment in another thread kinda made me laugh… except I also kinda cried. It read: “Yes, that’s correct. The ANCM just keeps on wait’in.” – guardrex
So that leads me to the next section of this post.
Let’s make a working ASP.NET Core Request Timeout!
So if the ANCM in-process waits by design… how do we make it so we don’t have runaway executions in the worst of circumstances? Before I address that let’s acknowledge the elephant in the room. If you actually have a runaway process running that long you should track it down and fix it. That said, sometimes you need the Band-Aid before the cure.
I’m not going to take the credit here. Googling around for information about the timeouts, I stumbled across a Stackoverflow question that had a perfect answer for us. I modified it only slightly:
public class MaximumRequestTimeoutMiddleware
{
	private readonly RequestDelegate _next;

	public MaximumRequestTimeoutMiddleware(RequestDelegate next)
	{
		_next = next;
	}

	public async Task Invoke(HttpContext context, IOptions<MaximumRequestTimeoutSettings> requestTimeoutSettings)
	{
		using (var timeoutSource = CancellationTokenSource.CreateLinkedTokenSource(context.RequestAborted))
		{
			timeoutSource.CancelAfter(requestTimeoutSettings.Value.Timeout);
			context.RequestAborted = timeoutSource.Token;
			await _next(context);
		}
	}
}
You probably noticed the code above is ultra-simple. All we’re doing is creating a linked token source from context.RequestAborted (default cancellation token). We set a configurable timeout, set the default RequestAborted token to our new tokensource token, and allow the middleware chain to continue.
For the purposes of the demo I’m only registering it to one specific endpoint using this code from Startup.cs:
app.UseWhen(context => context.Request.Path.StartsWithSegments("/requesttimeout/hastimeout"), appBuilder => appBuilder.UseMaximumRequestTimeout());Hey! Look at that! We now have an ASP.NET Core request timeout that works anywhere. More specifically, we have one that works while hosted in-process in IIS.

Looking deeper at the demo
For good measure let’s just take a quick look at the endpoints in our demo:
/requesttimeout/hastimeout: (GetTimeout) has a timeout configured for 1.5s via the middleware mapping./requesttimeout/notimeout: (NoTimeout) has no timeout and waits 10s before returning./requesttimeout/ridiculous: (RidiculousWait) has no timeout and waits a full 60s before returning.
Getting the application to run in outofprocess mode required a little work. First, I tried it with IIS Express but it didn’t seem to take. Instead, I had to publish the app and then hook it up to full IIS. Granted I could have set up a launchProfile option hooked up to IIS directly but I try to avoid those.
Anyway, upon publish and mapping to IIS, I managed to verify that the requestTimeout attribute works as expected (go figure!):
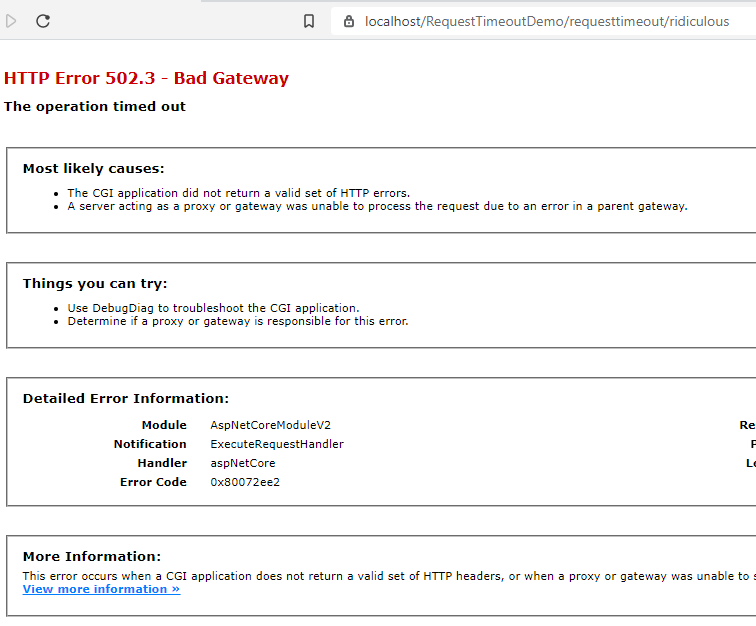
I’d like to point out that the error is still an “operation timed out” exception as opposed to a TaskCanceledException from our middleware. TaskCanceled is a sub-class of OperationTimedOut.
**PLEASE NOTE**
Ok, this is important. You need to make sure you propagate the cancellationToken from the Action methods. You’ll notice in my chintzy demo that I’ve propagated the token into the await Task.Delay. Why is that? Simply so when that token cancels, it also cancels the Task. Failing to do so will end up still waiting for the full 10 seconds interval. You should be doing this anyway.
Differences in approaches
The clear difference is hopefully an obvious one; that is, that you can’t get requestTimeout to work during in-process hosting. Aside from that, however, I’d like to allude to some differences in how the error is handled.
When the timeout occurs at the ANCM level, the error raises at the IIS level as well. This means “friendly” error pages need to also occur at the IIS level (web.config). You’ll have hopefully noticed that in IIS it surfaces as a 502.3 Bad Gateway error.
On the flip side, when the timeout occurs during the middleware–and specifically in this case in our API–the default error handling middleware takes over and serializes the error in a “friendly” fashion (see problemDetails). In my demo, you may have noticed it returns as a 408 Request Timeout error.
Summary
Relying too much on past knowledge can sometimes come back and bite you in the butt. It did me. ASP.NET Core 2.2+ allows us to host in-process. Doing so gives major performance gains *but* no longer respects a request timeout. ASP.NET Core Request Timeout ignores the requestTimeout attribute when hosted in IIS in-process. We can work around it by adding our own middleware and setting timeouts on the cancellationToken.
Remember that code for this post is located on GitHub.
Credits
Photo by Luca Severin on Unsplash